
Angular Data Binding Explained: Interpolation, Property, Event & Two-Way Binding (Chapter 3)
Learn Angular Data Binding from scratch. Understand Interpolation, Property Binding, Event Binding, and Two-Way Binding with simple examples and real-world use cases. Perfect for Angular beginners.
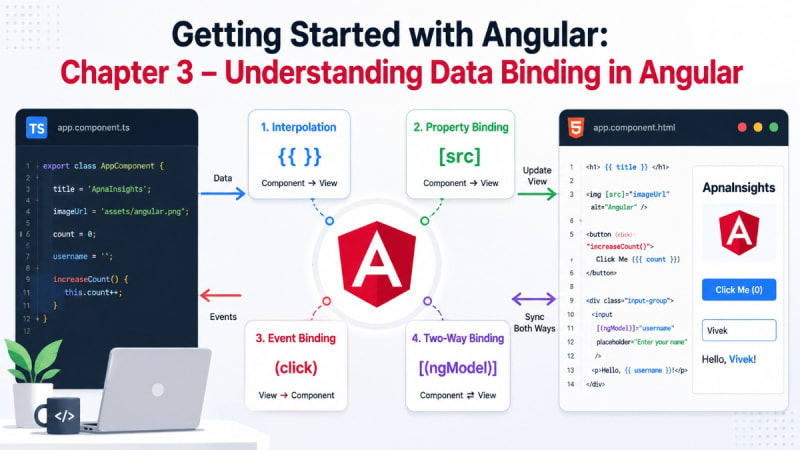
Getting Started with Angular: Chapter 3-Understanding Data Binding in Angular
In the previous chapter, we learned how an Angular project is organized and created our very first component. We explored the purpose of important folders and understood how components act as the building blocks of an Angular application.
Now it's time to make those components dynamic.
Imagine building a website where every piece of text has to be manually written inside HTML. Every button click would require refreshing the page. Updating user information would become painful.
This is exactly the problem Angular solves using Data Binding.
Data Binding allows your TypeScript code and HTML template to communicate with each other automatically. Instead of manually updating the DOM, Angular keeps everything synchronized for you.
In this chapter, you'll learn the four types of Data Binding used in Angular:
- Interpolation
- Property Binding
- Event Binding
- Two-Way Binding
By the end of this guide, you'll understand when and why to use each one.
What is Data Binding?
Data Binding is the process of connecting the data inside your component (TypeScript) with the user interface (HTML). Think of it like this:
TypeScript (Data)
↓
Angular
↓
HTML (View)
Whenever your data changes, Angular automatically updates the UI. Likewise, when users interact with the UI, Angular can update your component data. This automatic synchronization is one of Angular's biggest strengths.
1. Interpolation
Interpolation is the simplest way to display data. It uses double curly braces.
{{ value }}Example:
export class AppComponent {
  title = 'ApnaInsights';
}
HTML
<h1>{{ title }}</h1>Output
ApnaInsightsAngular evaluates the expression inside the curly braces and displays its value. You can also use expressions.
{{ 10 + 20 }}Output
30Or
{{ firstName + ' ' + lastName }}Interpolation is mostly used for:
- Titles
- User names
- Prices
- Dates
- Product names
- Blog headings
Whenever the value changes, Angular updates the page automatically.
2. Property Binding
Sometimes you don't want to display text. Instead, you want to change an HTML property. That's where Property Binding comes in.
Syntax
[property]="value"Example
imageUrl = 'https://example.com/angular.png';HTML
<img [src]="imageUrl">Angular assigns the value of imageUrl to the src property.
Another example:
isDisabled = true;HTML
<button [disabled]="isDisabled">Save</button>Output
The button becomes disabled.Property Binding is commonly used for:
- src
- href
- disabled
- value
- checked
- hidden
- class
- style
Instead of writing HTML manually, Angular controls these properties using component data.
3. Event Binding
Displaying data is useful. But applications also need user interaction. Buttons are clicked. Forms are submitted. Inputs receive text.
Angular captures these actions using Event Binding.
Syntax
(event)="method()"Example
export class AppComponent {
count = 0;
increaseCount(){
this.count++;
}
}
HTML
<button (click)="increaseCount()">Click Me</button>
<p>{{ count }}</p>
Every click increases the counter. Angular listens for the click event and executes the function. Other commonly used events include:
- (click)
- (input)
- (change)
- (keyup)
- (keydown)
- (submit)
- (mouseover)
Event Binding makes Angular applications interactive.
4. Two-Way Binding
Sometimes data should move in both directions.
For example:
A user types inside a textbox. The component updates instantly. If the component changes the value later, the textbox also updates automatically.
This is called Two-Way Binding.
Syntax
[(ngModel)]Example
username = '';HTML
<input [(ngModel)]="username">
<p>Hello {{ username }}</p>
If the user types:
VivekThe output immediately becomes:
Hello VivekNo additional code is required.
Two-Way Binding combines:
- Property Binding
- Event Binding
into one simple syntax.
To use ngModel, remember to import the appropriate forms package (such as FormModule or the standalone forms providers, depending on your Angular project setup).
Understanding the Flow
Here's an easy way to remember all four bindings.
Interpolation
Component -> HTML
Display text.
Property Binding
Component -> HTML Property
Update HTML attributes like image source or disabled state.
Event Binding
HTML -> Component
Capture user actions.
Two-Way Binding
Component <-> HTML
Both remain synchronized automatically.
Real-World Example
Imagine you're building a Login page.
username = '';
loading = false;
login() {
this.loading = true;
}
HTML
<input [(ngModel)]="username">
<button [disabled]="loading" (click)="login()">Login</button>
<p>Welcome {{ username }}</p>
Here you're using all four bindings together:
- Interpolation displays the username.
- Property Binding disables the button while loading.
- Event Binding calls the login() method when the button is clicked.
- Two-Way Binding keeps the input field and component data in sync.
This combination is extremely common in real-world Angular applications.
Best Practices
As you build larger applications, keep these tips in mind:
- Use Interpolation for displaying text.
- Use Property Binding to update HTML properties like src, disabled, and value.
- Keep Event Binding methods focused on a single responsibility.
- Use Two-Way Binding mainly for forms and user inputs.
- Avoid placing complex calculations directly inside templates; keep business logic in your TypeScript component for better readability and performance.
Summary
Data Binding is one of the most important concepts in Angular because it connects your application logic with the user interface.
In this chapter, you learned:
- What Data Binding is
- How Interpolation displays data
- How Property Binding updates HTML properties
- How Event Binding responds to user actions
- How Two-Way Binding keeps your UI and component synchronized
Mastering these four techniques will make it much easier to build interactive, responsive, and maintainable Angular applications.
In the next chapter, we'll explore Angular Directives, where you'll learn how to show, hide, repeat, and dynamically manipulate elements using directives like *if (now @if), *ngFor (now @for), and attribute directives in modern Angular.
Frequently Asked Questions
Why is Data Binding important in Angular?
Data Binding eliminates the need to manually update the DOM whenever data changes. Angular automatically keeps your application's data and user interface synchronized, making development faster, cleaner, and less error-prone.
Which type of Data Binding should beginners learn first?
Start with Interpolation because it's the simplest way to display data. Once you're comfortable with it, move on to Property Binding, Event Binding, and finally Two-Way Binding to build fully interactive applications.
Can I use multiple Data Binding techniques in the same component?
Yes. Most Angular components use a combination of different binding techniques. For example, you might display user information with Interpolation, disable a button using Property Binding, handle clicks with Event Binding, and capture user input using Two-Way Binding.
What are some common mistakes beginners make with Data Binding?
Some common mistakes include: Forgetting to import forms support before using ngModel. Using Interpolation where Property Binding is required. Writing complex business logic directly inside templates. Forgetting to call component methods through Event Binding.
Version History 2 updates
- Jul 24, 2026
Updated: title, description, content, categories, tags, featuredImage, images, status, faqs, seriesName, seriesOrder, wordCount, readingTimeMinutes, slug, rejectionReason
- Jul 24, 2026
Updated: title, description, content, categories, tags, featuredImage, images, status, faqs, seriesName, seriesOrder, wordCount, readingTimeMinutes, slug, rejectionReason